

That dark spot on the ceiling or the tell-tale drip… drip… drip… into a bucket is a homeowner’s nightmare. Your first thought is likely a massive, expensive problem, but what if the fix wasn’t a $500 professional service call, but a $50 DIY kit and one afternoon of your time?
For most homeowners, the reality of a leaking flat roof is far less dramatic than they imagine. In practice, many leaks aren’t caused by a total roof failure but by a small, specific issue—a tiny puncture from a fallen branch, a cracked seam, or old sealant around a vent pipe. Learning how to fix a leaking flat roof often starts by realizing the problem is manageable.
This guide is your first step toward taking control. It shows you how to play detective to find where water is actually getting in, which can be surprisingly far from the drip inside. You will learn the three most common DIY roof repair jobs you can safely handle. Most importantly, it gives you the clear, unmissable signs that tell you when to put down the tools and call a professional.
So, before you resign yourself to a hefty bill, take a deep breath. Gaining control begins with understanding the problem, and you have the ability to do just that. Let’s walk through the steps to repair a flat roof with the confidence of knowing what to look for and how to proceed.
Before You Climb That Ladder: 5 Signs You Must Call a Roofing Pro
The best DIY projects start with knowing your limits. While many small flat roof issues are perfect for a weekend fix, some problems are red flags indicating a much deeper issue. Misjudging the scope of the damage can lead to a failed repair, wasted money, or even a serious safety risk. Making the right call now is the most important step.
Before you buy any supplies, perform a quick visual assessment. If you spot any of the following signs, your job is simple: stop and call a professional roofer immediately. These issues often point to problems with the underlying structure or a failing roof system that a simple patch can’t solve.
- Significant Water Pooling: A few puddles after a storm are normal, but if you have areas of water over an inch deep that don’t evaporate after two dry days, it’s a major concern. The sheer weight of this “ponding water” can threaten your roof’s structure.
- Obvious Sagging or Soft Spots: As you carefully walk on the roof, does any part feel soft, spongy, or bouncy underfoot? This is a critical sign that water has penetrated the membrane and is rotting the wood decking below.
- Widespread Blistering: While a single, small blister can often be repaired, a roof dotted with numerous bubbles (more than 5-10) suggests a systemic failure of the roofing material.
- Large Tears or Separations: If you find a rip, tear, or separated seam that’s longer than a standard 12-inch ruler, it’s too large for a reliable DIY patch.
- Damage Near the Electrical Mast: Never attempt to repair any damage around the main electrical line connecting to your house. This is an extreme safety hazard.
If your roof is free from these major issues, you’re likely in a good position to tackle the repair yourself. Your next step is to play detective and pinpoint the exact source of the leak.
How to Play Detective: Finding the Real Source of Your Flat Roof Leak
Finding a leak in a flat roof can feel like a frustrating magic trick. The drip in your living room is rarely directly below the actual hole on the roof. Because most “flat” roofs have a slight slope for drainage, water can hit the surface, travel ten or fifteen feet, and then find a tiny opening to sneak through. Your first job as a roof detective isn’t just to spot the damage, but to trace the water’s hidden path back to its true entry point.
To narrow down your search area, start inside. Use a tape measure to get the distance from the interior water spot to two perpendicular walls (for example, 8 feet from the north wall and 5 feet from the east wall). Now, head up to the roof with your tape measure and repeat those same measurements. This simple triangulation technique gives you a specific starting point for your investigation, turning the entire roof into a much more manageable search zone.
Within that target zone, look for the obvious culprits. Scan the surface for any cracks, punctures, or bubble-like blisters. Pay close attention to the seams where roofing materials join together and the flashing—the material sealing the area around vents or pipes—as these are the most common failure points. Once you’ve located the likely suspect, the next crucial step is to identify what kind of roof you have, because using the wrong repair product can make the problem much worse.
What Kind of Roof Do You Have? A Simple 3-Type Identification Guide
Now that you’ve pinpointed the problem area, the next step is the most critical one: identifying your roofing material. Using the wrong patch is like trying to use wood glue on plastic—it simply won’t create a lasting bond, and your leak will be back with the next rainstorm. Each type of flat roof requires its own specific repair kit to create a permanent, waterproof seal. The guide below will help you identify the three most common types found on homes.
Figuring out what material you have is usually straightforward. Just look at its color and feel the texture.
A giant black inner tube; it’s smooth and has a distinctly rubbery feel. | EPDM Rubber | | Thick, black roofing paper with a gritty, sandpaper-like surface. | Modified Bitumen (also called roll roofing) | | A smooth, white or gray plastic-like sheet, often with visibly melted seams. | TPO or PVC (two different plastics that share a similar repair process)
Determining if you need an EPDM vs. a TPO roof repair is essential, as their patch kits are not interchangeable. The same goes for an asphalt roll roofing repair. If you look at your roof and still aren’t 100% sure, don’t guess. Snap a clear photo with your phone and take it to the pro desk at a hardware or roofing supply store. Once you’ve confidently identified your roof type, you’re ready to gather the right tools for the job.
Your Shopping List: The Right Tools and Materials for Your Repair
With your roof type identified, you can now walk into the hardware store and get exactly what you need without the guesswork. Using the right materials is the single most important factor in a successful, long-lasting repair. Grabbing the wrong product won’t just fail to fix the leak—it can often react with your roofing material and make the problem worse.
Walking down the roofing aisle can be overwhelming, but your needs are very specific. You’re looking for a repair kit or individual components, not a giant bucket of coating meant for an entire roof. Sealant is for filling gaps and seams, like caulk, while a coating is a paint-like layer for the whole surface. For these targeted repairs, you’ll need sealants and patches.
To make it simple, here’s your shopping list for the most common fixes.
- For a Rubber (EPDM) Tear: Look for an EPDM patch kit, which often includes a cleaner. If not, you’ll need:
- EPDM Primer: This is non-negotiable. It chemically prepares the rubber so the patch can create a permanent bond.
- Peel-and-Stick Patch: A piece of specialized rubber with a super-sticky backing.
- Lap Sealant: A specific type of caulk used to seal the edges of the finished patch.
- For a Modified Bitumen Blister/Crack:
- Roofing Cement: A thick, black, tar-like adhesive. It comes in a tub or caulk tube.
- Reinforcement Fabric: A special polyester mesh that you embed into the cement. It acts like rebar in concrete, giving the patch immense strength.
With the correct materials in hand, you’re ready to perform the repair. We’ll start with the most common fix: a small tear in a rubber roof.
How to Fix a Small Tear in a Rubber (EPDM) Roof
A tear from a fallen branch or sharp debris is a frequent issue for rubber roofs, but a professional-quality DIY flat roof patch is surprisingly simple. The secret isn’t brute force; it’s following the correct chemical process to ensure the patch bonds permanently with the roof. This method is specifically for EPDM rubber; a TPO roof repair requires different materials and techniques.
For a waterproof seal that lasts, carefully follow these steps:
- Clean the Area. Vigorously scrub an area at least 6 inches wider than the tear in all directions using your EPDM cleaner and a rag. The surface must be perfectly clean and completely dry for the next step to work.
- Prime the Surface. Brush a thin, even coat of EPDM primer onto the cleaned section. Let it dry until it’s tacky to the touch but doesn’t transfer to your knuckle—like the back of a sticker. This usually takes 10-20 minutes.
- Cut & Round the Patch. Cut your peel-and-stick patch to overlap the tear by at least 3 inches on all sides. Now for the pro-tip: use scissors to round the corners. Sharp 90-degree corners create a weak point that can easily lift and peel over time.
- Apply the Patch. Peel the backing off and carefully place the patch over the primed area. Start from the center and smooth outwards with your hand to push out any trapped air bubbles.
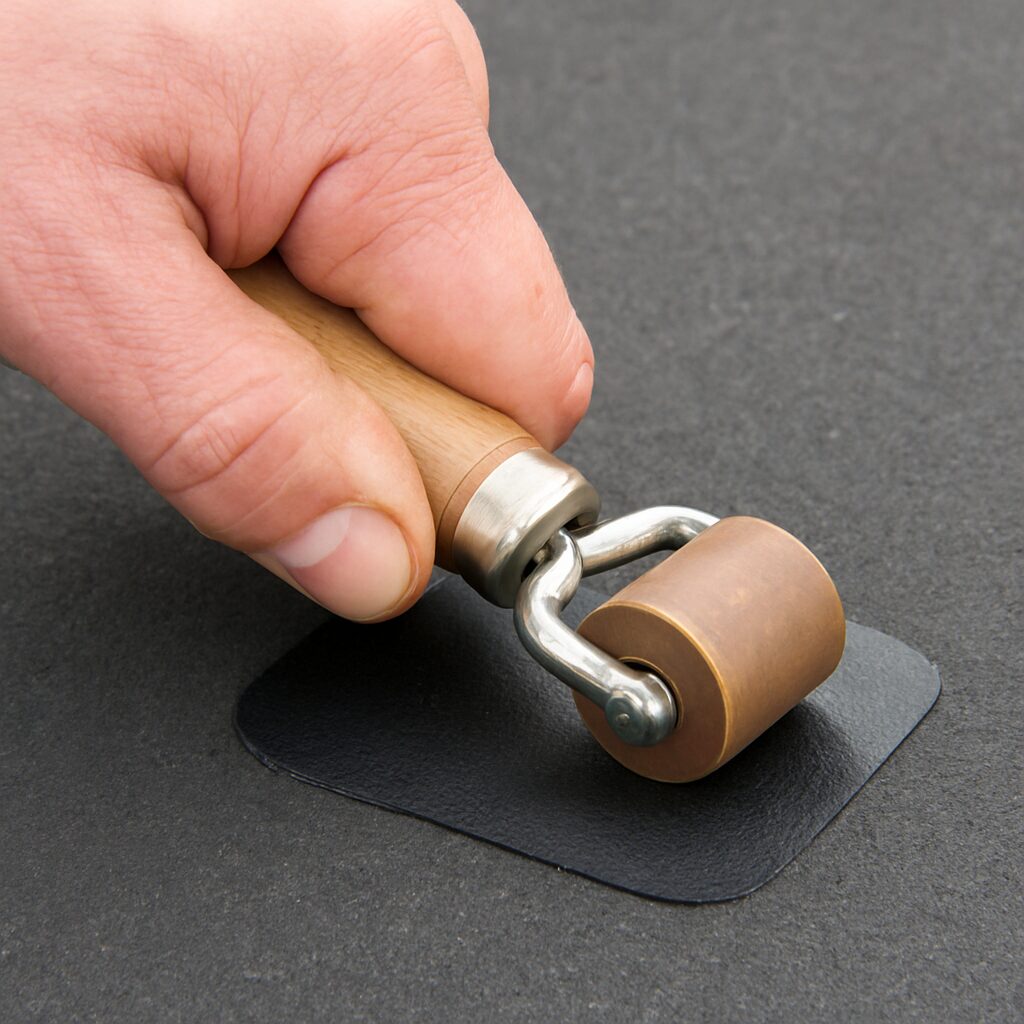
- Roll It Firm. Using a small, hard seam roller, press down on the entire patch with firm pressure, paying special attention to the edges. This step is critical; it forces the two surfaces to bond, creating a permanent, watertight seal. Finally, apply a thin bead of lap sealant around all edges of the patch for an extra layer of protection.
How to Fix Blisters or Cracks on a Felt or Asphalt Roof
On roofs that feel like coarse sandpaper—often called asphalt roll roofing or modified bitumen—you might notice bubble-like bumps or long, thin cracks appearing over time. These are known as roof blisters, and they’re caused by trapped air or moisture pushing the roofing material up. While they may seem harmless, they create a weak spot that will eventually split and cause a leak. Fortunately, you can flatten and seal these areas yourself using a utility knife, a trowel, and some roofing cement, which is a thick, tar-like sealant designed for this exact purpose.
Repairing a blister involves carefully opening it to release the pressure and then sealing it for good. Before you begin, make sure the area is clean, dry, and free of any loose gravel.
- Slice the Blister. With your utility knife, carefully cut an ‘X’ shape through the center of the blister, extending the cuts just past its edge. Fold back the four flaps you’ve created.
- Dry the Area. If the surface underneath is damp, it must be completely dry before you proceed. Use a rag to soak up any water and let it air-dry thoroughly.
- Apply Cement. Using your trowel, spread a thick, even layer of roofing cement on the exposed area under the flaps, like you’re spreading thick peanut butter.
- Press and Seal. Press the four flaps back down firmly into the cement. For an extra-strong repair, you can embed a piece of roofing reinforcement fabric into the wet cement before spreading a final top coat over everything. This last layer should cover the entire patch and extend two inches beyond the cuts, creating a durable, waterproof seal.
This method works wonders for the main surface of your roof, but leaks often start where the roof meets an object, like a vent pipe or chimney.
The Right Way to Reseal a Leaky Roof Vent or Flashing
Most leaks don’t happen in the middle of the roof but at these vulnerable intersections. The material used to seal the gap where your roof meets a wall, chimney, or vent pipe is called flashing. Over time, the sealant that protects this flashing can crack and pull away from the surface, creating a perfect pathway for water to get in. Learning how to fix a leaking flat roof often starts right here, as resealing these joints is one of the most effective ways to solve a stubborn leak.
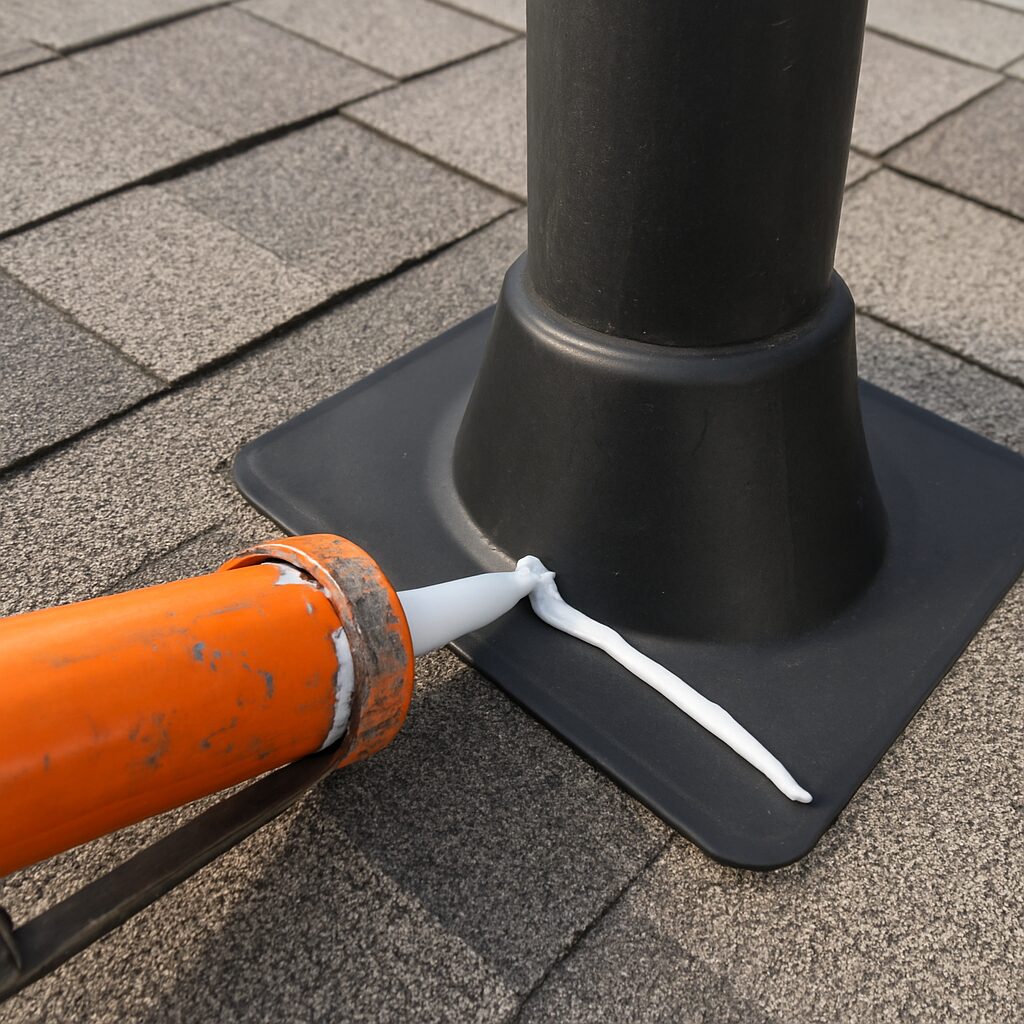
Your first instinct might be to just smear new sealant over the old, cracked material, but this is like painting over peeling paint—it won’t last. The secret to a durable repair is to completely remove the failed sealant. Use a putty knife or a 5-in-1 tool to scrape and pry away all the old, brittle gunk. Once it’s gone, thoroughly clean the area with a wire brush and a rag to ensure the new sealant has a perfect, dirt-free surface to grab onto. This single step is the difference between a temporary patch and a long-term fix.
With the area prepped, it’s time to apply a new, continuous bead of lap sealant (a special flexible caulk for roofs). As shown in the photo, hold your caulk gun at a 45-degree angle and apply a thick, steady bead—about a half-inch wide—over the entire joint. The goal is one unbroken line with no gaps. Resist the urge to smooth it with your finger, as this can create thin spots. These steps to reseal a flat roof use a specific flat roof sealant for the joint, which is very different from a flat roof coating designed to cover the entire roof.
Temporary vs. Permanent: Understanding Flat Roof Sealants and Coatings
That distinction between a sealant and a coating is crucial because it helps you match the right product to your problem. Think of sealants, cements, and peel-and-stick patches as first aid for your roof. They are designed for targeted spot repairs—sealing a single crack, patching a small puncture, or fixing that one leaky seam you just found. These products provide an excellent, immediate, and affordable temporary flat roof leak fix. For an isolated issue, a $20 tube of lap sealant is often all you need to stop a drip in its tracks and keep your home dry.
A roof coating, on the other hand, is a much bigger project with a different goal. Instead of spot-fixing, a coating is a thick, liquid membrane—often silicone or acrylic—that you roll across your entire roof surface. This process creates a brand-new, seamless, and waterproof layer, essentially giving your old roof a new lease on life. This isn’t a fix for a single puncture; it’s a solution for a roof that is aging, showing widespread cracking, or has multiple minor issues. A liquid rubber roof repair kit is often used for this kind of restorative work.
So, how do you choose? The answer depends on the scope of the problem. If you’re dealing with one or two specific, identifiable leaks, stick with sealants and patches. It’s the most direct and cost-effective approach. However, if your roof looks tired everywhere and you’re chasing new leaks every year, a full coating can be a smart investment to prolong its life for another 5 to 10 years. Knowing this difference is key to managing your budget.
What Does It Cost? A Realistic Look at DIY vs. Professional Flat Roof Repair
When you’re looking at a small, isolated problem, the cost difference between DIY and hiring a professional is significant. For a simple puncture or a short, separated seam, a DIY flat roof patch is incredibly affordable. A trip to the hardware store for the right sealant, cleaner, and a small roll of patch tape will typically cost between $40 and $80. If you already own the basic tools, that’s your total expense for stopping the leak.
Hiring a professional roofer, however, introduces a different cost structure. Even if the repair itself only takes 30 minutes, you aren’t just paying for that time. You’re covering their travel, insurance, expertise, and the cost of running a business. Most roofing companies have a minimum service call fee to make the trip worthwhile, which can range from $250 to over $500. This is the baseline professional roof repair cost, regardless of how minor the issue is.
The decision, then, comes down to a simple trade-off between savings and certainty. Tackling the job yourself offers huge savings, but you take on the responsibility for getting it right. Paying a professional costs more, but you’re buying their experience and often a warranty on the work. If you feel confident after identifying your roof type and the source of the leak, doing it yourself can be a major win.
Your Post-Repair Checklist: How to Test Your Work and Maintain Your Roof
With the patch applied, the hardest part is over. But before you put your tools away, your repair needs time to “cure,” which just means it needs to fully harden and bond to the roof surface. Think of it like letting glue set. Most sealants and patches need at least 24-48 hours, but check your product’s label for specific timing. After it has fully cured, you can perform a gentle water test: use a garden hose to spray the area for a few minutes, mimicking a light rain. If everything stays dry inside after the next downpour, you’ve officially succeeded.
That successful patch stops today’s leak, but a little proactive care can prevent tomorrow’s. Most major flat roof issues begin as small, easy-to-fix problems like a peeling seam or a small crack in the sealant. By shifting from a reactive mindset to a preventative one, you can catch these minor issues before they allow water in, saving you from repeating the process of repairing a flat roof all over again.
Adopting a simple inspection routine is the most effective way to ensure your roof stays healthy. Here is a basic flat roof maintenance checklist to perform each spring and fall:
- Clear all debris. Remove any leaves, twigs, and dirt that can trap moisture and hide problems.
- Inspect all seams and flashing. Look closely for any areas that are peeling, cracked, or bubbling.
- Check drains and scuppers. Ensure they are completely clear so water can flow off the roof freely.
You’ve Done the Hard Part: A Confident Homeowner’s Path Forward
That dreaded ceiling drip has lost its power over you. Before, it was a sign of an expensive, unknown problem. Now, you know how to play detective on your rooftop, spotting the difference between a simple fix and a serious issue. You can confidently identify a small tear, a common blister, or a cracked sealant—the exact kinds of jobs you are now equipped to handle.
Armed with this DIY roof patch guide, you can walk into the hardware store, select the right products for your roof type, and follow a clear process to fix a leaking flat roof. The real reward isn’t just in the hundreds of dollars you can save, but in the profound peace of mind you’ll feel the next time storm clouds gather. Your repair isn’t just a patch; it’s a testament to your capability.
Ultimately, learning how to repair a flat roof has done more than just solve one problem. You’ve transformed a source of anxiety into an opportunity for empowerment. Your home is no longer a collection of potential disasters, but a place you can understand, care for, and improve. That newfound confidence is the most valuable tool you’ve gained today.