How to Attach Gutter to a House
Water is the single greatest enemy of your home’s foundation. Without a proper drainage system, rainwater sheets off your roof, pounding the soil directly next to your house. Over time, this leads to soil erosion, basement leaks, damaged siding, and even cracked foundations. While the prospect of drilling into your home’s fascia might seem intimidating, installing rain gutters is a manageable project for a dedicated DIYer with the right tools and a solid plan.
Installing your own gutters can save you a significant amount on labor costs, but it requires precision. A gutter system that isn’t pitched correctly won’t drain, and one that isn’t fastened securely will sag or rip away during the first heavy storm. This guide breaks down the process of planning, measuring, and attaching gutters to ensure your home stays dry and your curb appeal remains intact.
Whether you are replacing an old, rusted system or installing brand-new aluminum channels, the principles remain the same. You need to manage the flow of water from the roof to the ground efficiently. By following these steps, you can tackle this weekend project with confidence and protect your biggest investment from water damage.
Tools and Materials You Will Need
Before you climb the ladder, you need to gather your supplies. Gutter installation is not a project where you want to be running back and forth to the hardware store. Having everything on hand ensures the sealant doesn’t dry out while you’re looking for a screw.
Essential Hardware and Materials
- Gutter Sections: Aluminum is the most common choice for DIYers because it is lightweight and rust-resistant. Vinyl is easier to cut but can crack in extreme cold.
- Downspouts: You will generally need one downspout for every 30 to 40 feet of gutter run.
- Fascia Brackets (Hidden Hangers): These clip inside the gutter and screw into the fascia. They look cleaner and are stronger than old-school spikes and ferrules.
- End Caps: You need a right and left cap for every run that doesn’t wrap a corner.
- Elbows and Straps: These are used to direct the downspout back toward the house and then away from the foundation at the bottom.
- Sealant: Use a high-quality gutter sealant or silicone. Do not use standard caulk, as it will not hold up to the constant exposure to water.
- Fasteners: 1/4-inch hex head screws (often called “zippers”) and 1/8-inch rivets.
- Flashing: To prevent water from running behind the gutter.
Required Tools
- Extension Ladder: Ensure it is stable and tall enough to work comfortably.
- Cordless Drill/Driver: For driving screws into the fascia.
- Aviation Snips or Hacksaw: To cut the aluminum gutters to length.
- Crimper: A specialized tool to crimp the ends of the downspouts so they fit inside one another.
- Chalk Line: Essential for snapping the slope line.
- Level: To check the fascia and vertical alignment of downspouts.
- 4-inch Hole Saw: To cut the outlet hole for the downspout.
- Safety Gear: Thick gloves (sheet metal is sharp) and safety glasses.
Step 1: Measuring and Planning the Slope
The most critical math involved in hanging gutters is the slope (also called the pitch). Gutters must slope toward the downspout to let gravity do its work. If they are perfectly level, water will stand still. If they slope the wrong way, they will overflow.
calculating the Pitch
The standard rule of thumb for effective drainage is a 1/4-inch slope for every 10 feet of gutter. For example, if you have a 40-foot run of gutter, the end with the downspout should be 1 inch lower than the high end.
Some sources suggest a steeper pitch, up to 1/2 inch per 10 feet, for areas with exceptionally heavy rainfall. However, for most homes, 1/4 inch provides good drainage without the gutter looking noticeably crooked on the house.
Marking the Fascia
- Find the High Point: Mark the spot on the fascia board at the end of the roof furthest from the downspout. Ideally, this should be about an inch or so below the drip edge flashing.
- Calculate the Low Point: Measure the length of the run. Apply the 1/4-inch-per-10-feet rule to find how far down the low mark should be.
- Snap the Line: Tack a nail at the high point and one at the low point. Hook your chalk line to the nails, pull it tight, and snap a line across the fascia. This line represents the top of the gutter (or the mounting bracket location, depending on your bracket style).
Step 2: Installing Gutter Brackets
In the past, gutters were hung with long spikes driven through the front of the gutter into the wood. Today, hidden hangers are the industry standard. They clip inside the gutter and are invisible from the ground, providing better support and a cleaner look.
Hanger Spacing
Proper spacing is vital for the longevity of the system.
- Standard Spacing: For most climates, place a hanger every 24 inches.
- Snow and Ice Zones: If you live in an area with heavy snow (like New York), reduce the spacing to 18 inches. Ice is heavy, and wide spacing can cause the gutters to rip off the house under the weight.
Locate the rafter tails behind the fascia board if possible. These are the solid wood beams that support the roof overhang. Screwing your brackets into the rafter tails provides significantly more holding power than screwing into the fascia board alone. Mark these locations along your chalk line.
Step 3: Cutting and Assembling on the Ground
It is much safer and easier to assemble your gutter sections on the ground rather than trying to juggle 10-foot lengths of aluminum while standing on a ladder.
Cutting to Length
Measure your roofline and transfer that measurement to the gutter. Use aviation snips or a hacksaw to cut the gutter. If you are using snips, cut the sides first, then bend the gutter to snap the bottom, or cut straight through. Wear heavy gloves, as the cut edges will be razor-sharp.
Installing End Caps and Outlets
- End Caps: Attach the end caps to the open ends of the gutter. Use gutter sealant on the inside of the cap before sliding it on. Secure it with a crimping tool or rivets.
- Downspout Outlet: Place the gutter upside down on two sawhorses. Place the outlet connector where you want the downspout to be. Trace the inside of the outlet onto the gutter. Drill a starter hole, then use the aviation snips or a 4-inch hole saw to cut out the opening. Insert the outlet and secure it with rivets.
Step 4: Attaching Gutters to the House
With your sections assembled and your brackets marked, you are ready to hang the metal. This is easier with a helper who can hold one end while you secure the other.
- Position the Gutter: Lift the gutter section up and align the top edge with the chalk line you snapped earlier.
- Secure the Brackets: Drive the mounting screws through the hidden hangers and into the fascia/rafter tails. Start with the center bracket to hold the weight, then work your way to the ends.
- Check the Flashing: The gutter should slide under the roof’s drip edge flashing. This ensures that water running off the shingles drips into the gutter, not behind it. If your house doesn’t have a drip edge, or it’s painted shut, you may need to install an apron flashing to bridge the gap.
If you have a run longer than 40 feet, it is best to pitch the gutters from the center out toward downspouts at both ends. This prevents the gutter from dropping too low on the fascia at the far end.
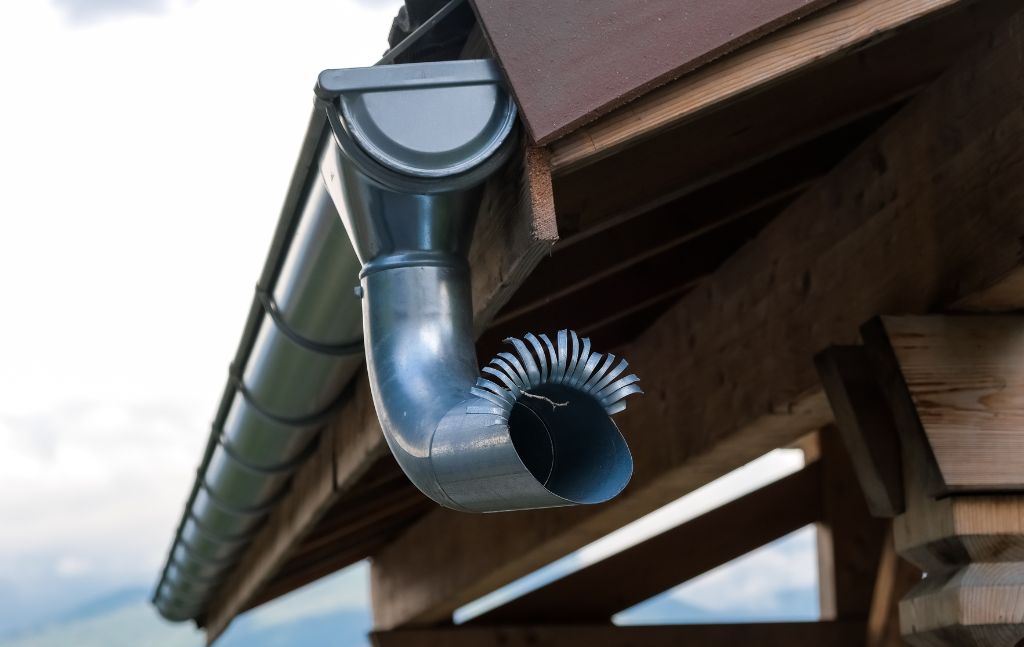
Step 5: Installing Downspouts
The downspout carries the water from the gutter to the ground.
- Attach the Elbow: Secure an elbow to the outlet tube dropping down from the gutter using short sheet metal screws or rivets.
- Measure the Pipe: Hold another elbow against the wall of the house in line with the top elbow. Measure the distance between them and cut a piece of downspout to connect them. This brings the pipe from the overhang back to the wall.
- Secure to the Wall: Use downspout straps (also called pipe bands) to secure the vertical pipe to the side of the house. Use two straps for a one-story house and three for a two-story house.
- The Bottom Elbow: At the bottom, attach a final elbow to direct water away. Crucially, add an extension or splash block to ensure water discharges at least 4 to 6 feet away from the foundation. Dumping water right at the base of the wall defeats the purpose of the gutter.
RH Renovation LLC is your Local Gutter Installer in New York
If you’re in New York and need gutters that drain properly, stay secure, and protect your home’s foundation, RH Renovation LLC can help. We install and replace gutter systems that fit your roofline, handle heavy rain, and direct water safely away from your siding and landscaping.
Our gutter services include:
- Gutter installation: We specialize in seamless gutters that minimize leaks and improve aesthetics.
- Gutter repair: We fix leaks, sagging sections, loose hangers, and pitch issues to restore proper function.
- Gutter replacement: We can remove worn, undersized, or damaged systems and replace them with durable modern materials.
- Downspout installation: We ensure reattachment and proper placement to improve drainage and reduce overflow.
Whether you’re attaching new gutters or fixing an existing system, RH Renovation LLC can recommend the right materials, spacing, and mounting method for a long-lasting result. Contact RH Renovation LLC to schedule an estimate and get your gutters secured the right way.
Common Mistakes to Avoid
Even experienced DIYers can make errors that compromise the system. Watch out for these pitfalls:
- Installing Level Gutters: Remember, “level looks good, but slope works.” Always verify your pitch with a level.
- Spacing Hangers Too Far Apart: Skimping on brackets saves a few dollars now but leads to sagging gutters later. Stick to the 24-inch (or 18-inch for snow) rule.
- Ignoring the Seams: If you have to join two sections of gutter, overlap them by at least 8 inches and seal the joint heavily with silicone. Secure it with rivets, not screws (screws catch leaves and cause clogs).
- Poor Downspout Placement: Ensure your downspouts discharge into a safe area, not onto a walkway where they can create ice patches in winter, or directly against the foundation.
Maintenance and Cleaning Best Practices
Once your gutters are attached, the job isn’t over. A clogged gutter is just as bad as no gutter at all.
- Regular Cleaning: Clean your gutters at least twice a year—once in late spring (after seeds fall) and once in late autumn (after leaves fall).
- Check for Leaks: During a rainstorm, walk around your house. If you see water dripping from a seam or end cap, mark it and apply fresh sealant once it dries.
- Tighten Hardware: Over time, wind and snow can loosen fasteners. Inspect your brackets annually and tighten any loose screws.
- Gutter Guards: Consider installing mesh or screen guards. While they don’t eliminate the need for cleaning entirely, they significantly reduce the frequency by keeping large leaves out.
Final Thoughts on Gutter Installation
Attaching gutters to your house is a project that yields immediate rewards. The next time a storm rolls through, you will have the satisfaction of watching the water flow smoothly away from your home rather than pooling at your feet. It improves the longevity of your siding, landscaping, and foundation.
While the process requires careful measuring and a comfort level with heights, the steps are straightforward. However, if your roof is particularly steep, or if the fascia board shows signs of rot that need professional carpentry, do not hesitate to call in an expert. The goal is a dry, safe home—however you choose to get there.